How to build a robot to win the Science Olympiad Robot Tour event
When I first got this event, I was excited because it involved something I enjoy: programming. I was determined to win. The rules for the event are simple: create a robot that can autonomously navigate a track to different points without bumping into the walls.
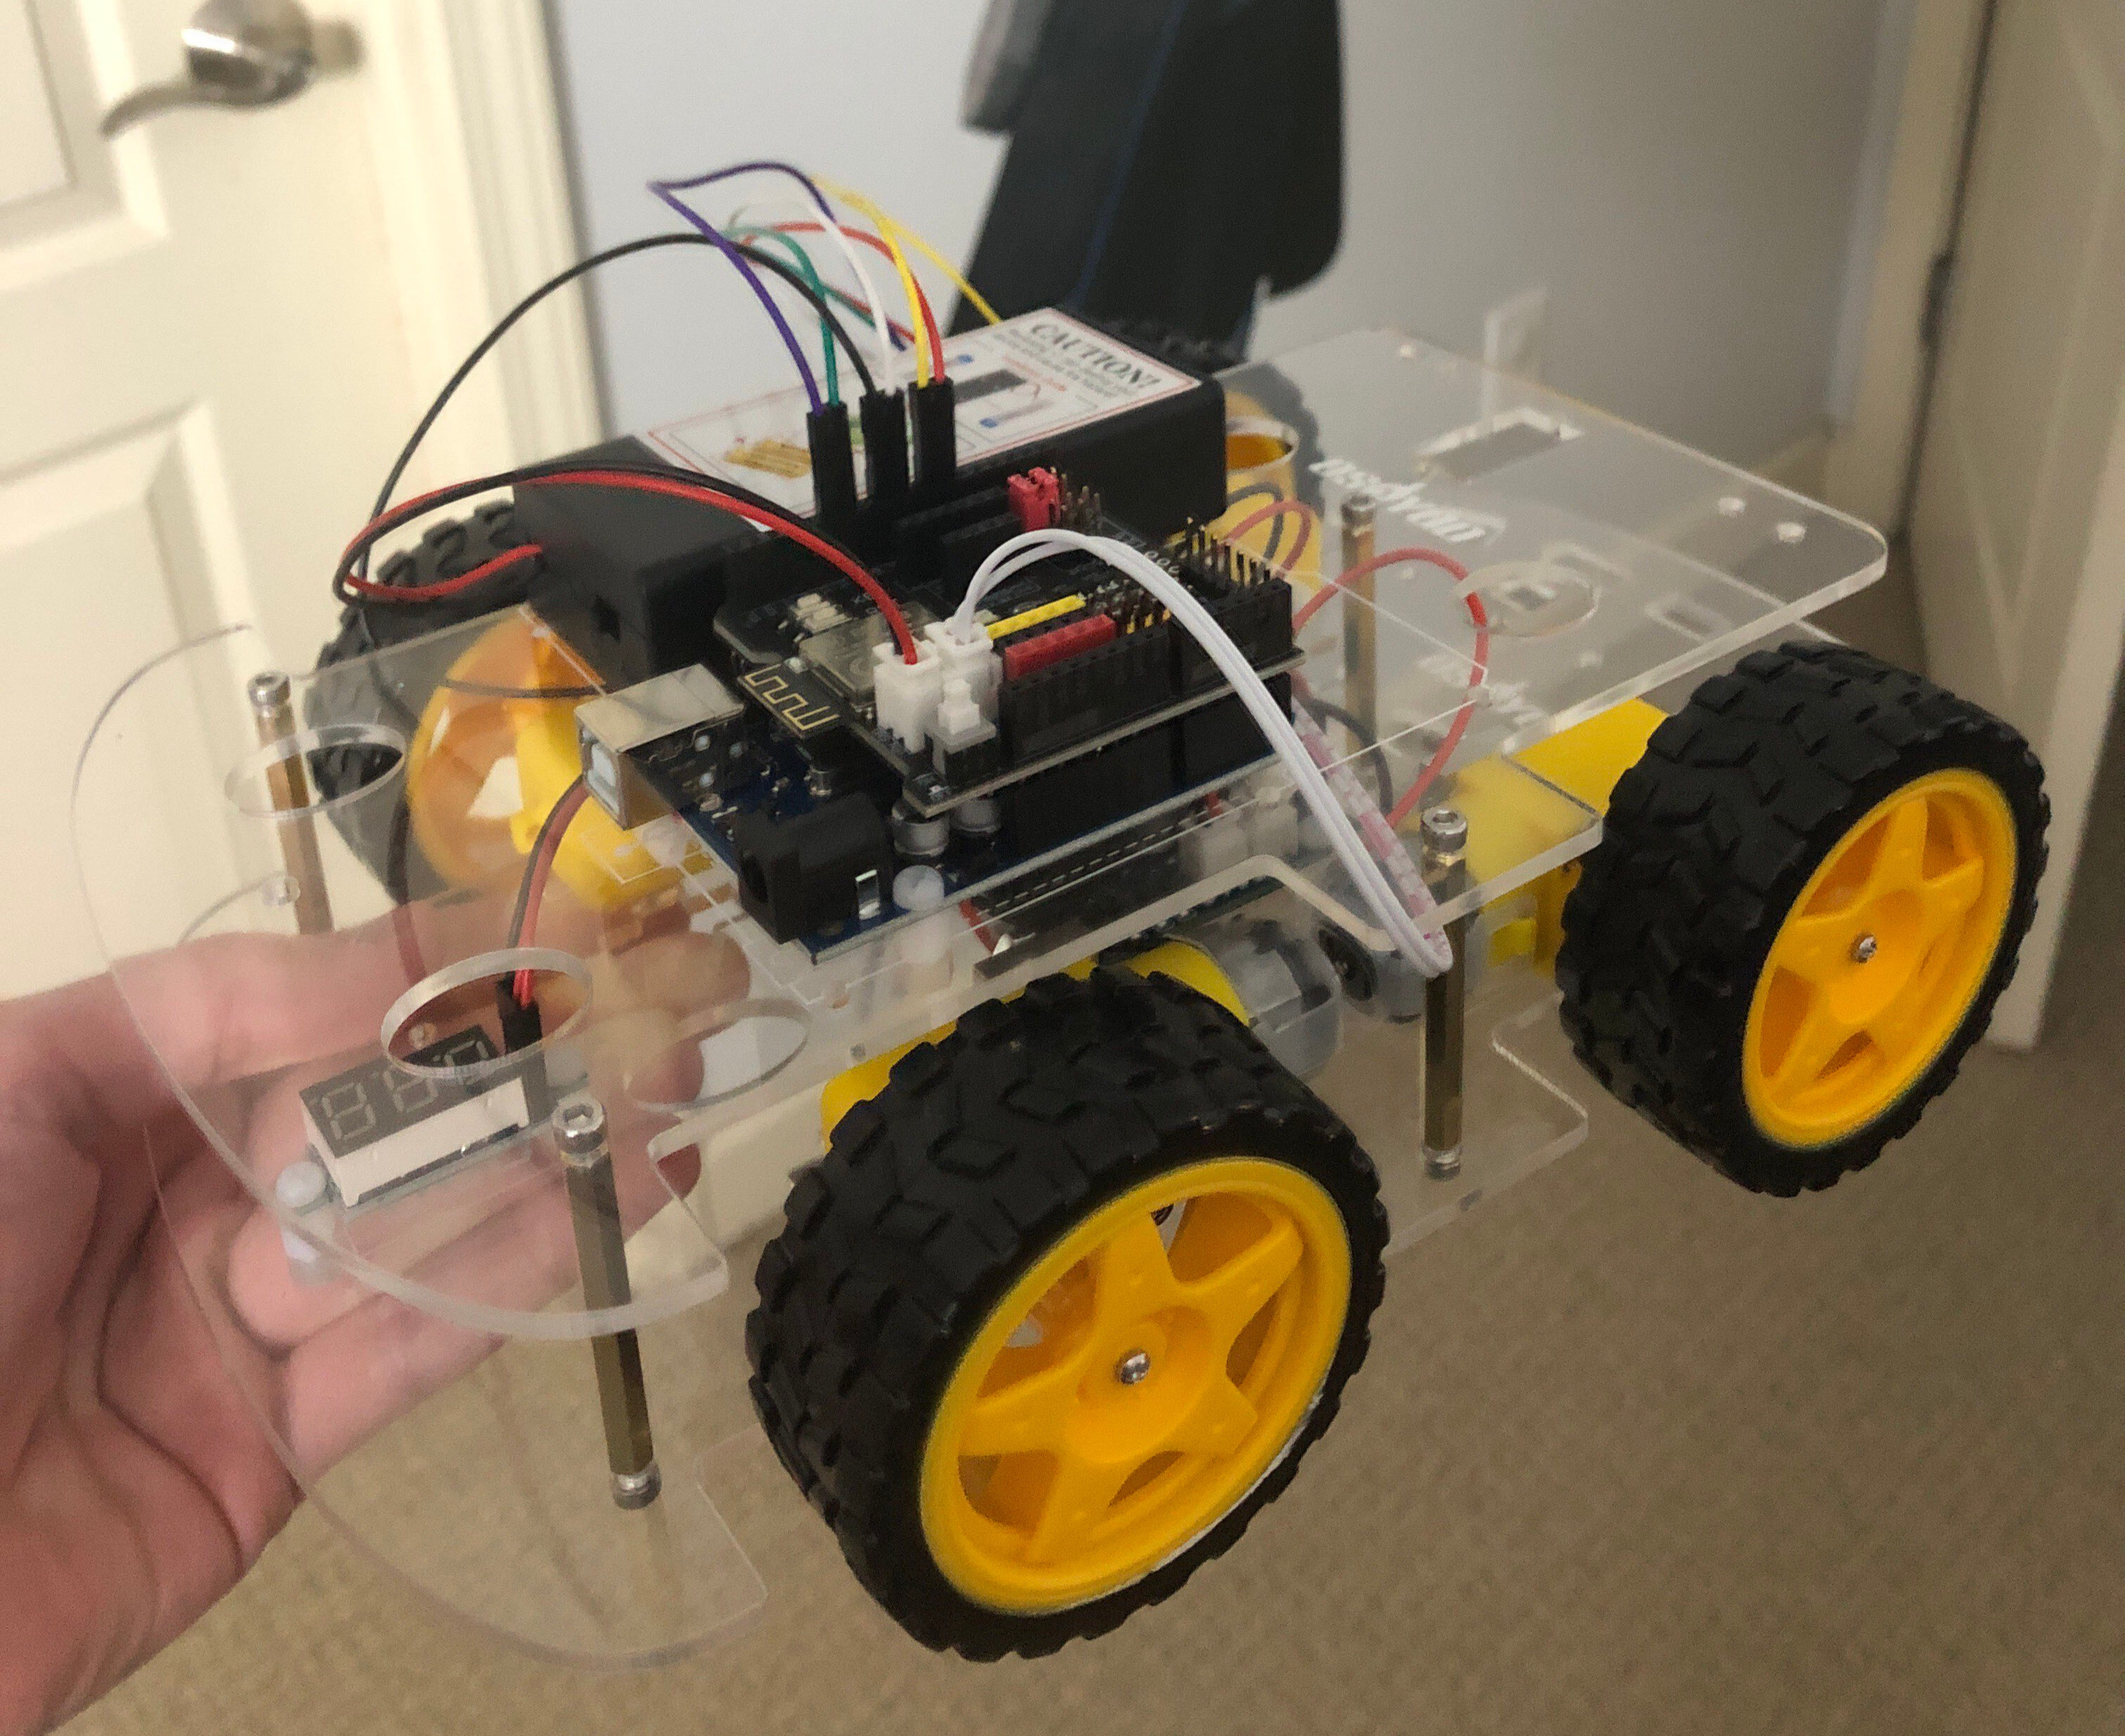
Before this, I had not done anything with electronics, and I had never taken a physics class, so I didn't really know where to start. I tried looking up some example robots from past years, but I didn't have much luck because this was the first year of the event. I searched online for a kit to start with, and ended up getting the OSOYOO V2.1 Robot Kit. This kit came with an Arduino Uno, and lots of sensors that I thought I may use. After putting the car together, it looked like this:
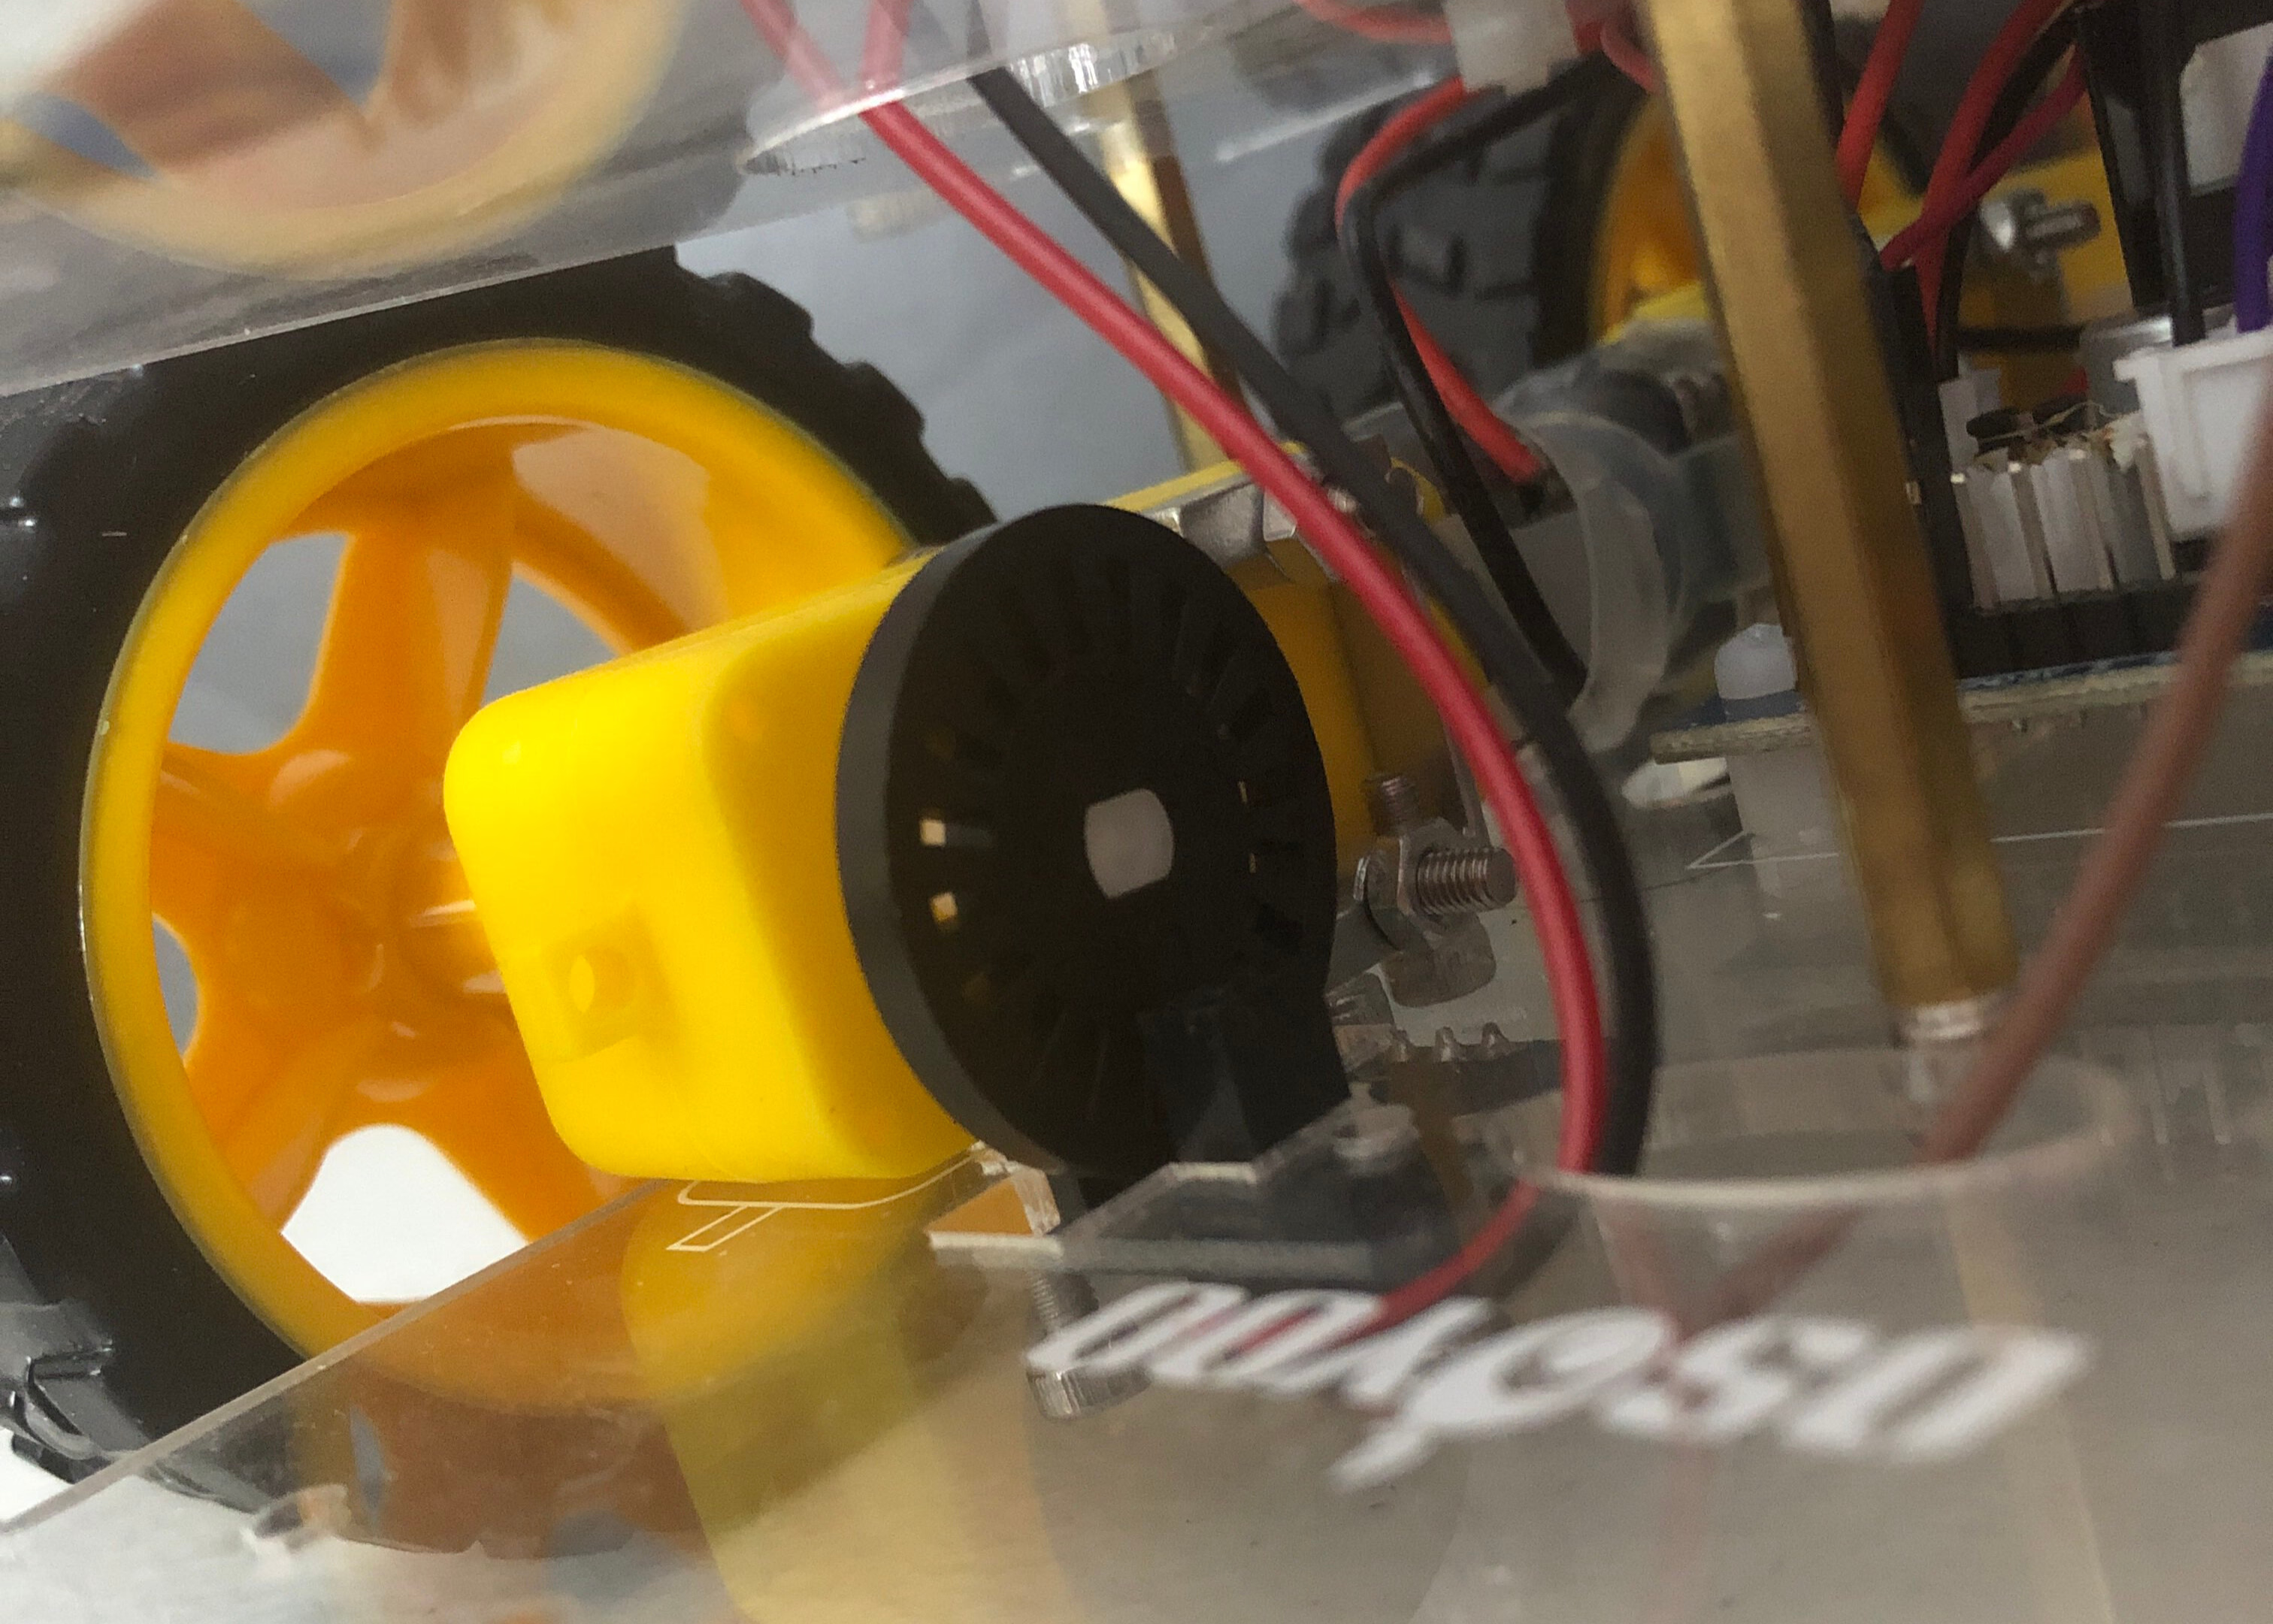
There is two main things I need the robot to be able to do in order to get around the track. First, the robot needs to be able to go a precise amount of distance, and second the robot needs to be able to turn to a precise direction. This is because the robot needs to know exactly where it is on the track at all times, so that it does not hit the walls or go outside the track. In order to keep track of the distance the robot has traveled, I got a HC-020K Disc Encoder which I put on one of the front wheels. When the wheel turns, the encoder turns with it. The disc has slots in it that let a laser pass through, and you can use the amount of times the laser passed through the disc to determine the distance that the car has traveled.
To measure the direction the robot is facing, I got an MPU-6050 sensor, which is an accelerometer and gysoscope. The gyroscope measures angular velocity, which can be integrated to get the angle. I used the library MPU6050_light to do this. Since it is integrated, the values become more and more inaccurate over time, but the robot is not running long enough for this to be an issue.
Here is some basic code to test various movements of the car:
1
#define speedPinR 9
2
#define RightMotorDirPin1 12
3
#define RightMotorDirPin2 11
4
#define speedPinL 6
5
#define LeftMotorDirPin1 7
6
#define LeftMotorDirPin2 8
7
8
voidinitPins()
9
{
10
pinMode(RightMotorDirPin1, OUTPUT);
11
pinMode(RightMotorDirPin2, OUTPUT);
12
pinMode(speedPinL, OUTPUT);
13
14
pinMode(LeftMotorDirPin1, OUTPUT);
15
pinMode(LeftMotorDirPin2, OUTPUT);
16
pinMode(speedPinR, OUTPUT);
17
stop();
18
}
19
20
voidforwards()
21
{
22
digitalWrite(RightMotorDirPin1, HIGH);
23
digitalWrite(RightMotorDirPin2,LOW);
24
digitalWrite(LeftMotorDirPin1,HIGH);
25
digitalWrite(LeftMotorDirPin2,LOW);
26
analogWrite(speedPinL, 120);
27
analogWrite(speedPinR, 100);
28
}
29
30
voidreverse()
31
{
32
digitalWrite(RightMotorDirPin1, LOW);
33
digitalWrite(RightMotorDirPin2,HIGH);
34
digitalWrite(LeftMotorDirPin1,LOW);
35
digitalWrite(LeftMotorDirPin2,HIGH);
36
analogWrite(speedPinL, 120);
37
analogWrite(speedPinR, 100);
38
}
39
40
voidstop()
41
{
42
digitalWrite(RightMotorDirPin1, LOW);
43
digitalWrite(RightMotorDirPin2,LOW);
44
digitalWrite(LeftMotorDirPin1,LOW);
45
digitalWrite(LeftMotorDirPin2,LOW);
46
}
47
48
voidturnLeft(byte speed = 140)
49
{
50
digitalWrite(RightMotorDirPin1, HIGH);
51
digitalWrite(RightMotorDirPin2,LOW);
52
digitalWrite(LeftMotorDirPin1,LOW);
53
digitalWrite(LeftMotorDirPin2,HIGH);
54
analogWrite(speedPinL,speed);
55
analogWrite(speedPinR,speed);
56
}
57
voidturnRight(byte speed = 140)
58
{
59
digitalWrite(RightMotorDirPin1, LOW);
60
digitalWrite(RightMotorDirPin2,HIGH);
61
digitalWrite(LeftMotorDirPin1,HIGH);
62
digitalWrite(LeftMotorDirPin2,LOW);
63
analogWrite(speedPinL,speed);
64
analogWrite(speedPinR,speed);
65
}
66
67
voidsetup()
68
{
69
initPins();
70
}
71
72
voidloop()
73
{
74
// test movement of robot
75
reverse();
76
delay(1000);
77
stop();
78
delay(500);
79
}
To have the robot go a certain distance I used an Arduino interrupt to call a function every time the wheel moving triggers the Disc Encoder:
1
// global variable that counts the times the sensor was triggered
2
int pulses = 0;
3
bool turning = false;
4
5
voidpulseEvent()
6
{
7
// pulses generated when turning the robot should not count
The 3.65 represents the amount of pulses per centimeter, I found this using trial and error. Next I created a function to set the angle of the robot to whatever angle from 0-360°.
It's important to call mpu.update() as often as possible so the error from integration is minimal. I went back and added that to the distance function and any other code that loops.
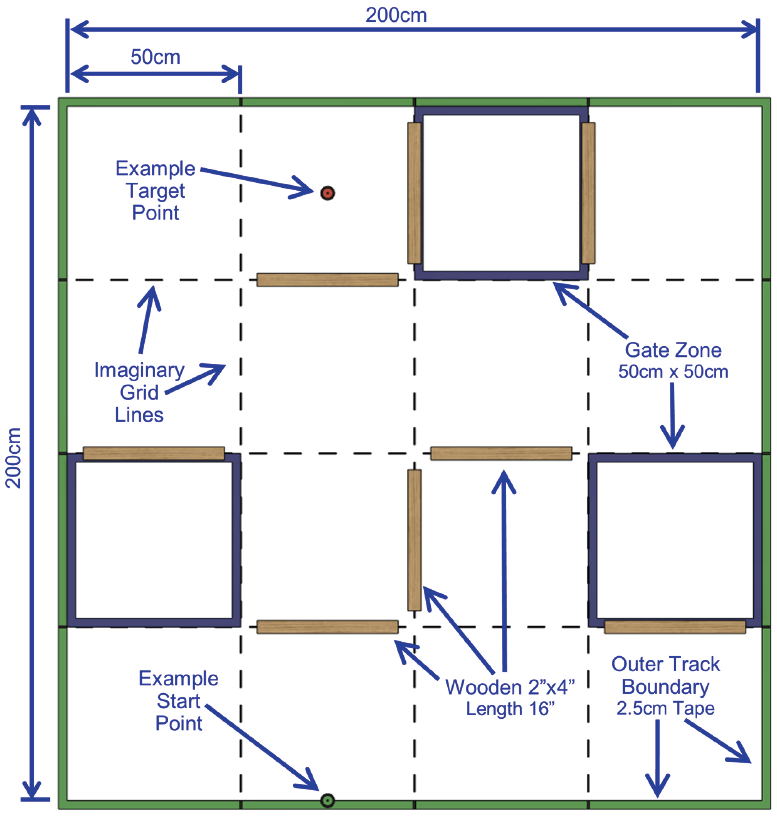
Since I now had working angle and distance code, I could have just created functions for going up, right, down, or left on the grid, but I wanted something better. Here is an example track:
In this event, the goal is to go from the start point to the end point, and you get bonus points if you go through the gate zones. On the day of the event you get 10 minutes to prepare before you run the robot, and I didn't think this would be enough time to plan out the full route. Instead, I wanted to make a program that could determine the best route through all 3 gate zones, and only require the track as input.
To do this I used multiple recursive loops, and unfortunately due to the low memory capacity of the Arduino Uno I was not able to find the best possible route, but it was close enough to work. Here is the code for that:
1
#include"OptimalPath.h"
2
3
staticconstint TRACK_SIZE = 9;
4
staticconstint GATE_ZONE_COUNT = 3;
5
staticconstint MAX_PATH_LENGTH = 50;
6
7
// this is equal to factorial of GATE_ZONE_COUNT
8
staticconstint GATE_ZONE_COMBINATIONS = 6;
9
Point permutations[GATE_ZONE_COMBINATIONS][GATE_ZONE_COUNT];
10
int permutationIndex = 0;
11
12
// track is filled with s for start point, t for target point, g for goal point, and x for a wall
if (!path.empty() && (path.size() < shortestPathLength))
176
{
177
bestPath.clear();
178
for (Point p : path)
179
{
180
bestPath.push_back(p);
181
}
182
shortestPathLength = path.size();
183
}
184
}
185
return bestPath;
186
}
The reason this is not the best possible path is because on line 118 you can see I check each direction of the path, and return the first one that completes the path. To make this better, it should store all 4 paths and only return the shortest one, but in my testing I always ran out of memory on the Arduino. The regional competition is on a 5x5 track, but the state and national competitions are on bigger tracks. This code should work on bigger tracks, but I imagine the Arduino Uno would run out of memory.
The getPath function returns a vector containing all the points. I used the following code to convert the points to movements for the robot:
1
voidloop()
2
{
3
pulses = 0;
4
Vector<Point> path = getPath();
5
for (int i = 0; i < path.size() - 1; i++)
6
{
7
if (path[i + 1].y - path[i].y == 2)
8
{
9
// down
10
setAngle(180);
11
delayMPU(100);
12
setAngle(180, 100);
13
delayMPU(50);
14
setAngle(180, 100);
15
delayMPU(50);
16
moveDistanceCM(50);
17
delayMPU(100);
18
}
19
elseif (path[i + 1].y - path[i].y == -2)
20
{
21
// up
22
setAngle(0);
23
delayMPU(100);
24
setAngle(0, 100);
25
delayMPU(50);
26
setAngle(0, 100);
27
delayMPU(50);
28
moveDistanceCM(50);
29
delayMPU(100);
30
}
31
elseif (path[i + 1].x - path[i].x == 2)
32
{
33
// right
34
setAngle(270);
35
delayMPU(100);
36
setAngle(270, 100);
37
delayMPU(50);
38
setAngle(270, 100);
39
delayMPU(50);
40
moveDistanceCM(50);
41
delayMPU(100);
42
}
43
elseif (path[i + 1].x - path[i].x == -2)
44
{
45
// left
46
setAngle(90);
47
delayMPU(100);
48
setAngle(90, 100);
49
delayMPU(50);
50
setAngle(90, 100);
51
delayMPU(50);
52
moveDistanceCM(50);
53
delayMPU(100);
54
}
55
56
// wait for button press
57
while (digitalRead(buttonPin) != HIGH) {};
58
}
The reason I call setAngle so much is because calling it just once results in an overshoot because after the motors stop, momentum carries the robot a little bit farther. I found the easiest way to fix this was just to call setAngle a few times with a delay to stop the momentum. It's probably not the best solution, but it works.
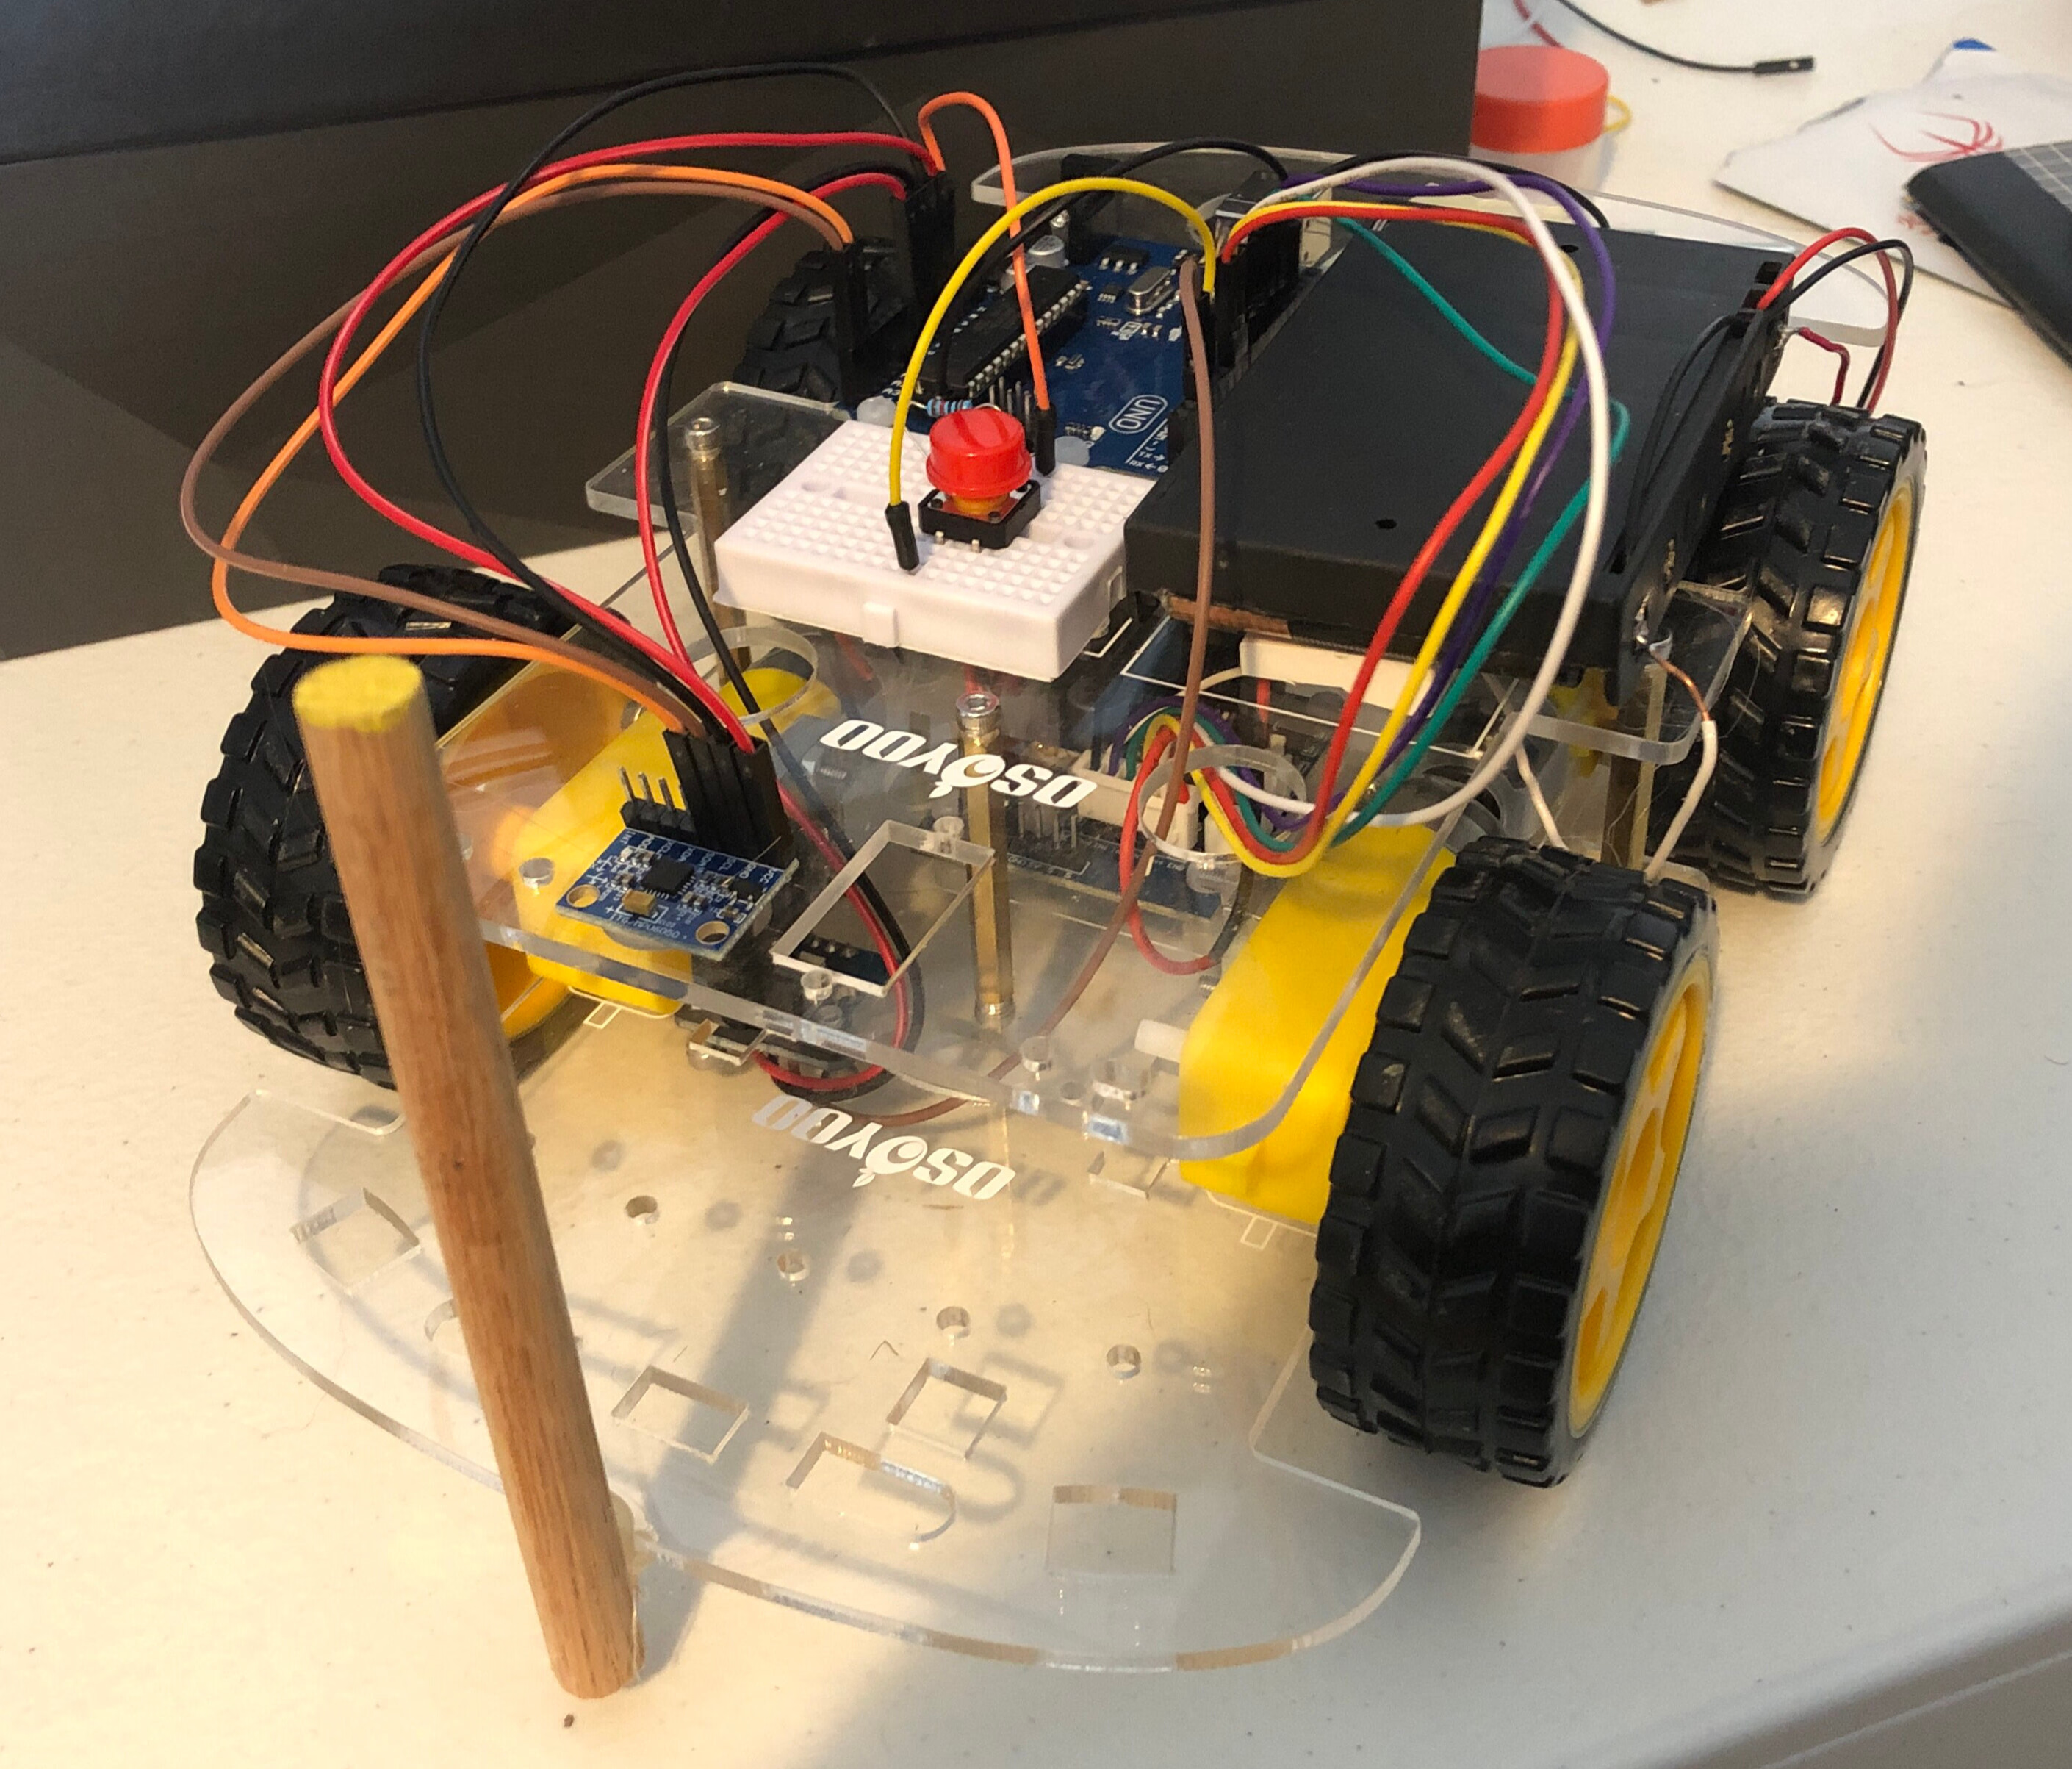
Another issue I had with this robot is the batteries. According to the rules you must have 6 1.2-1.5 volt batteries, but the robot kit I bought came with 2 4.5 volt batteries. I had to buy a new battery pack and solder the +/- ends to the 12V pins on the motor driver. I really thought the solder would break off, or just not work, but luckily it all held together.
Here is how the final robot looked, complete with a button to turn it on, and the required wooden dowel attached to the front:
At the regionals competition the robot worked perfectly; it didn't hit any walls, and it went from start to finish through all 3 goals. For this event, there is a time goal, and you get the most points the closer you are to the time. I was too busy working on making sure the car turned to the right angle, and went the right distance, that I didn't add any code to slow the car to reach the time goal. I ended up placing 2nd. My team did not place high enough to go to states, so I don't think I will continue to work on the robot. If I did though, I would get brakes, which I noticed the team that won had, to remove the momentum of movement that I couldn't account for. I would also get a better Arduino so I wouldn't run out of memory on bigger tracks. If you would like to look at the full code for this project, you can view it on my GitHub.